
Capturing the Moment: Tips for Photographing Whales in Hawaii

Hawaii’s clear waters are some of the best places in the world to see whales. Every winter, thousands of humpback whales travel to Hawaii to mate, have babies, and take care of their young. For people who love to take pictures, this is an amazing chance to see these beautiful marine mammals in their natural habitat.
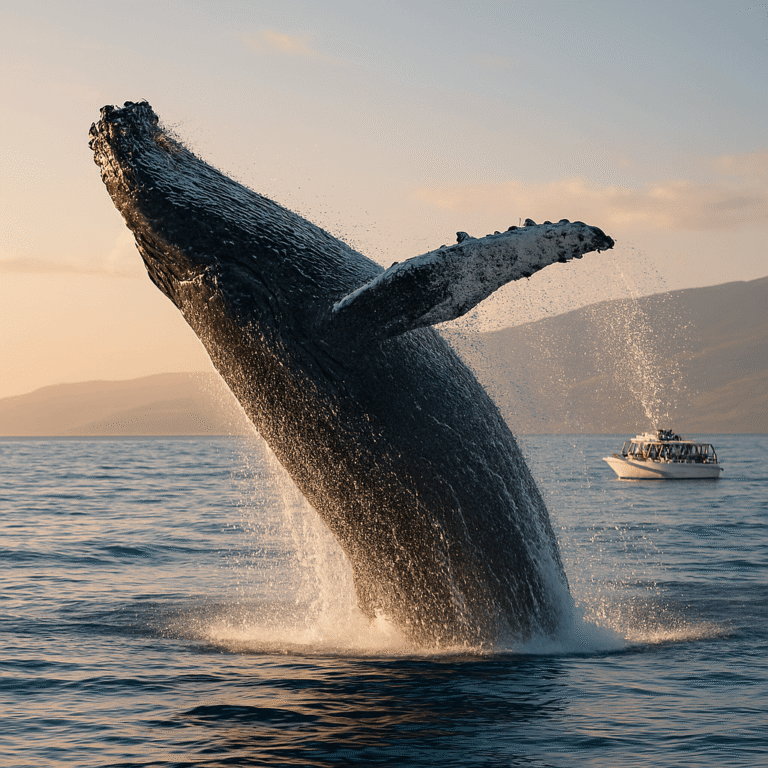
You need to be patient, skilled, and use the right method to take pictures of whales. Wildlife photography, especially marine wildlife photography, requires you to be flexible and think on your feet. This is different from studio photography, where you control everything. But the rewards are amazing. One frame can show how graceful a 40-ton humpback whale is when it breaches the surface or how sweet a mother and her calf are together.
This complete guide will give you all the information and skills you need to take great pictures of whales in Hawaiian waters. These tips will help you take great whale photos that tell a story, whether you’re a beginner with a smartphone or an experienced photographer with professional gear.
Good whale photography combines camera familiarity, patience and respectful distance. Whales are unpredictable, so prepare settings in advance and be ready to photograph a brief surface movement without pursuing the animal.
Understanding Hawaiian Whale Seasons
When to go whale watching in Oahu and all of Hawaii
Hawaii’s humpback season generally runs from November through May, with peak abundance usually January through March. For timing and viewpoints, use our season and shore-viewing locations guide. The rest of this article focuses on the photograph itself.
This guide focuses on humpbacks, the conspicuous seasonal visitors many people hope to photograph. Do not assume a distant blow or fin identifies a species with certainty; record the observation and avoid overstating the identification.
Light depends on the direction of the coastline, cloud cover and time of day. Morning or late-afternoon light can be attractive, but no fixed time guarantees calm seas or greater whale activity. Choose an angle that reduces glare while keeping a safe position.
The weather is very important for taking good pictures of whales. Trade winds can make the water choppy, which makes it hard to keep the camera steady. Check the weather forecasts for your area and pick days when the winds are lighter and the waves are smaller for the best shooting conditions.
Essential Equipment for Whale Photography
Camera Bodies and Lenses
For whale photography, you need a camera that can focus quickly. DSLR and mirrorless cameras are the best, but don’t forget about modern smartphones that can take pictures from far away. Having gear that can quickly focus and take pictures of fast-moving things is the most important thing.
A telephoto lens with a focal length of 70 to 200 mm is very flexible when it comes to choosing a lens. If your budget allows, a 100-400mm lens offers even greater reach for distant subjects. Keep in mind that you’ll often be taking pictures from a moving boat, so it’s very important to have image stabilization.
When taking pictures of whales, a fast continuous shooting mode (burst mode) is very useful. These beautiful animals can jump out of the water at any time, so having more than one frame increases your chances of getting the perfect shot. Set your camera to continuous autofocus mode to track moving subjects effectively.
Stabilization and Support
On land, support can help with a long lens where permitted and where it does not obstruct others. On a vessel, follow the operator’s equipment rules and keep passageways clear; a tripod or monopod can become a trip hazard. Maintaining your balance comes before stabilizing the camera.
You might want to use a camera strap that keeps your gear close to your body. Unfortunately, cameras often fall during whale watching trips, and the ocean is not kind to electronics.
Settings for taking pictures of whales with a camera
Which Exposure Mode Should You Use?
For taking pictures of whales, shutter priority mode (S or Tv mode) works really well. You can control motion blur with this setting, and the camera will take care of changing the aperture to get the right exposure.
As a starting point, try around 1/1000 second for a breach and adjust for subject movement, focal length, light and camera motion. A faster shutter reduces motion blur; it does not guarantee focus or sufficient depth of field. Review a test frame and increase the speed if movement is still blurred.
What is the best shutter speed for taking pictures of whales?
For a slower surface movement, 1/500 second may be workable from a stable position. Fast action may benefit from 1/1000 to 1/2000 second or faster. These are starting points, not fixed rules. Nikon’s shutter-speed explanation describes the underlying balance between motion and exposure.
Don’t be afraid to try using slower shutter speeds to get creative effects. A shutter speed of 1/125th to 1/250th of a second can create beautiful motion blur in the water while keeping the whale relatively sharp, conveying a sense of movement and grace.
You should keep your ISO settings as low as possible while still getting the shutter speed you want. Modern cameras do a good job with ISO 800–1600, but you should always put proper exposure ahead of low noise levels. A slightly grainy, properly exposed image is superior to a noise-free, underexposed photograph.
When to Take Pictures of Whales
How to Find Whales in Hawaii
If you can read whale behavior, you will be much more likely to get good photos. People who have seen whales before look for “footprints” on the water’s surface. These are smooth, circular areas made by a whale’s tail flukes below the surface.
Look for blows, backs and flukes. Surfacing intervals vary, so do not rely on a fixed countdown. After a dive, scan the wider area instead of keeping the lens locked on the last spot.
A fluke-up dive can signal that a whale is submerging, but it does not reveal exactly where or when it will return. Use the pause to check exposure, remaining storage and your surroundings.
Reading Behaviors on the Surface
Slower surface activity allows more time to compose, but resting animals still need space. Use a long lens or crop for detail rather than moving closer. The humpback behavior guide explains how to describe what you see.
Breaches can happen without warning. Keep the camera ready, but regularly look beyond the viewfinder to maintain awareness of your footing, other people and the broader ocean. A missed frame is preferable to losing your balance.

How to Compose Whale Photos
Setting the scene and point of view
The rule of thirds works great for taking pictures of whales. Put the whale’s eye or the action point along the lines where your imaginary grid lines cross. This makes compositions that are more dynamic and interesting to look at than centering your subject.
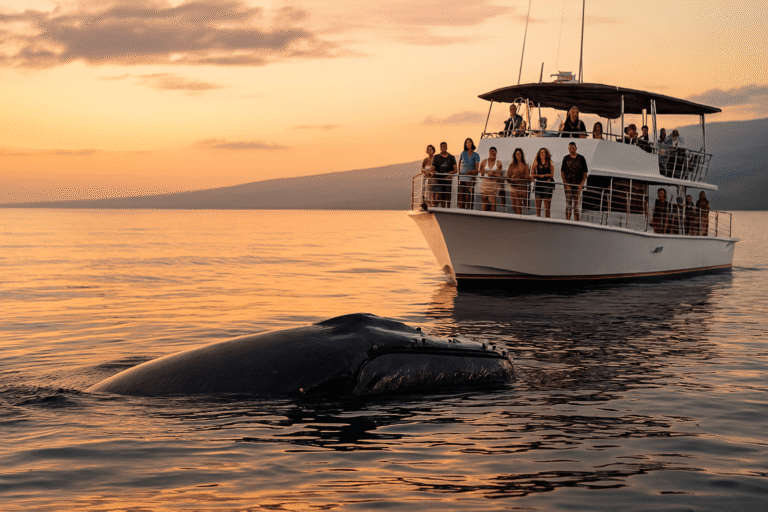
In your shots, show the environment around you. Pictures of whales up close are beautiful, but pictures of whales in their natural Hawaiian habitat tell a fuller story. Add things like other islands in the background, dramatic clouds, or the boat’s shape to show how big it is.
Use different compositions only from safe, permitted positions. An elevated public viewpoint can include coastline and habitat in the frame. Do not lean beyond railings, climb wet rocks or step into a wave-wash area for a lower angle.
Using Natural Light
Hawaiian sunlight can be intense and create harsh shadows. Early morning and late afternoon light provides warmer, more flattering illumination. But don’t completely rule out taking pictures in the middle of the day. The bright light lets you use faster shutter speeds and lower ISO settings.
Backlighting can create dramatic silhouettes, especially during sunrise or sunset whale watching trips. When a whale breaches against the sun, the shadow it casts can be very strong and beautiful.
Cloudy conditions often provide the most even lighting for whale photography. Overcast skies act like a natural softbox, getting rid of harsh shadows and making sure that the light is even across the whole frame.
How to Take Pictures of Humpback Whales in Particular
Learning about how humpbacks act
Humpback whales are great subjects for dynamic photography because they are known for their acrobatic displays. These whales often breach, slap their tails, and do other things on the surface that make for great photo opportunities.
Pairs of mothers and calves need special attention. Maintain respectful distances and avoid using flash photography, which can disturb these sensitive interactions. The bond between mother and calf provides some of the most emotionally powerful whale photographs.
If a whale comes closer to a vessel, photography remains secondary to following official response guidance. Do not encourage, touch or prolong the encounter. The sanctuary’s boating guidance explains what to do within 100 yards.
Getting pictures of unique humpback features
Humpback whales have distinctive features that make them photographically interesting. Their long pectoral fins, unique head tubercles, and unique tail fluke patterns make them easy to identify and great for art.
Fluke pigmentation, scars and trailing-edge shape can help researchers identify individual humpbacks. A clear photograph may be useful when submitted to an appropriate research project, but an image does not automatically become scientific data. Keep the original file and accurate location and date information.
Head tubercles and pectoral fins may be visible with adequate optical reach. If the detail is too small from the lawful viewing distance, choose an environmental composition instead of approaching.
New and creative ways to do things
Artistic Effects and Motion Blur
While sharp images are typically preferred, creative use of motion blur can convey the power and grace of whale movement. Try using slower shutter speeds while panning with the whale’s movement to make the background blur while keeping the whale in focus.
Taking multiple pictures of whales can help you make art about how they behave. This method is especially good for recording behaviors that happen over and over, like tail slapping or breaches that happen in a row.
Why Underwater Approaches Are Not a Visitor Technique
Do not enter the water or use a camera to approach humpbacks for an underwater image. Special equipment and swimming experience do not exempt a visitor from wildlife regulations. Close underwater research images may have been obtained under permits that do not apply to the public.
For this Hawaii visitor guide, plan images from shore or an appropriate vessel. Do not use split-level or underwater photography as a reason to position yourself near a whale. A surface photograph can tell the story without changing the encounter.
Post-Processing Tips for Whale Photos
Simple Changes
Whale photography often requires post-processing to bring out the best in your images. Start by making simple changes to the exposure to bring out details in both the whale and the water around it.
Contrast adjustments can help separate the whale from the background, especially in overcast conditions. Be careful not to over-process—maintain the natural look of the marine environment.
There is often a blue tint from the sky and water that needs to be fixed. Set the white balance so that the whale’s skin looks natural while keeping the Hawaiian waters’ beautiful blue color.
Sharpening and Reducing Noise
Using higher ISO settings in difficult lighting situations may cause noise. Modern noise reduction programs can get rid of grain while keeping important details like the whale’s skin texture and the water droplets.
Selective sharpening can make important details stand out, like the whale’s eye or skin texture, without making the whole picture too sharp. Apply sharpening only where necessary by using masking techniques.
Things to think about for safety and ethics
Taking care of marine animals
Hawaii’s humpback approach restriction prohibits approaching within 100 yards by means including boats, kayaks, paddleboards and swimmers. It is not limited to commercial vessels. Follow the official rules and the separate restrictions applicable to aircraft.
Don’t ever try to touch or swim with wild whales. These wild animals are strong and can hurt people without meaning to. Also, whales can become stressed and stop doing what they normally do when they come into contact with people.
Don’t use flash photography, as it can bother whales and other marine life. Modern cameras work great in natural light, so you don’t need a flash to take pictures of whales.
Awareness of the environment
Keep your observation passive. Do not call, splash, feed wildlife or try to trigger a breach. Use the responsible whale-viewing guide for practical distance and disturbance guidance.
Sharing your pictures in a responsible way can help protect whales. Teach other people why it’s important to protect these amazing animals and their Hawaiian home.
Getting ready for your whale photography trip
Choosing a Suitable Viewpoint
Choose a lawful viewpoint with a clear view and room to handle your equipment without obstructing others. Verify opening hours, trail conditions and any restrictions before leaving. A location that requires unsafe footing is not a suitable photographic position.
Plan for the distance you can realistically photograph. A distant whale within a wider coastal scene can make a stronger and more honest image than an excessively enlarged, unclear close-up. Do not choose a viewpoint solely on claims of guaranteed close encounters.
Getting Ready for Your Trip
Charge batteries, check available storage and practice changing settings before leaving. Bring spares if needed for your camera and planned duration. Familiar controls are more useful during a brief sighting than unfamiliar equipment.
Use rain covers or clear plastic bags to keep salt spray off your equipment. Salt water can damage camera gear permanently because it is very corrosive.
If motion sickness or another health concern could interfere with your balance or attention, consider photographing from shore. Ask a qualified health professional about any medication rather than following a generic dosing or timing recommendation.
Making Your Hawaiian Whale Photography Dreams Reality
Taking pictures of whales in Hawaiian waters is one of the most rewarding challenges in wildlife photography. The combination of stunning natural beauty, fascinating animal behavior, and technical photographic skills creates an unforgettable experience that goes far beyond simple tourist snapshots.
Success in whale photography comes from preparation, patience, and respect for these incredible marine mammals. Every trip gives you new chances to learn and improve your skills, as well as a deeper appreciation for Hawaiian marine life.
Keep in mind that the best picture of a whale is often the one you didn’t plan. Stay alert, keep your camera ready, and remain flexible in your approach. The most memorable times you see whales are often when you least expect them.
Start with a verified viewpoint from the whale season and locations guide, prepare your settings, and keep expectations flexible. The aim is to document an observation while allowing the animal to continue undisturbed.